
The knitted brioche stitch is fairly well defined. But what is crochet brioche?
As usual, crochet terminology is not standardized. There are lots of different stitch patterns, constructed in various ways, that have been called crochet brioche.
However, as a result of the work of designer Lilla Björn, Tatsiana Kupryianchyk, the technique currently most often designed as crochet brioche is a post stitch pattern.
Tatsiana says herself that she essentially has tried to recreate the visual aspect of a two-colour brioche stitch. I would add that her technique also works like the knitted stitch pattern in that it creates vertical stripes when working horizontally.
When it comes to the characteristics of the crochet fabric, it resembles knitted brioche in some ways, but not in others.
Knitted brioche produces a thick and squishy fabric. This holds for the crochet version as well. The crochet brioche stitch actually produces two layers of post stitches. If you use a springy DK weight wool, as I did in my swatches, you will get a very thick fabric! Tatsiana recommends using lightweight yarn. I will give my opinion at the end of this article.
However, knitted brioche gives a very elastic fabric, and this is less true for the crocheted version. In some of her first patterns, published in 2017, Tatsiana tried to build in more elasticity in the fabric by using chains to link the post stitches. I have also found this method in other patterns described as crochet brioche (some of the ones I’ve found are from 2015 and 2016 and thus predate Tatsiana’s work).
Crochet brioche can also be worked with single crochet stitches rather than chains. The result will be a bit firmer, but the size of your hook and the yarn used are other important factors affecting the outcome.
Below I will first explain the brioche stitch using chains, and then the single crochet version. I suggest you try both and then choose the one you find the easiest to work or the best adapted to your project.
Important notes:
You will need two colours of yarn (in the same weight) and a hook suited to your yarn.
The chain at the beginning of each row does not count as a stitch.
Post stitches count as a stitch in the current row. This means that the stitch in the previous row that is behind the post stitch must be skipped.
Two-colour crochet brioche is a two-row stripe pattern (even if it doesn’t look that way!). Colour changes should be made when completing the last stitch in the row before starting a row in the new colour. For more information about neat colour changes, check out my tutorial from January 2018.
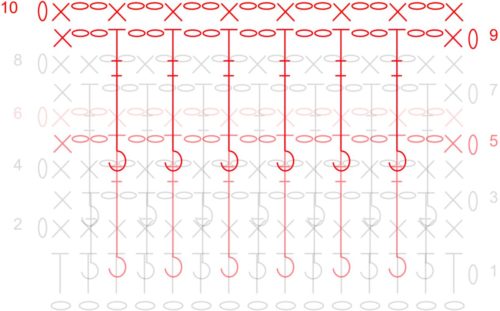
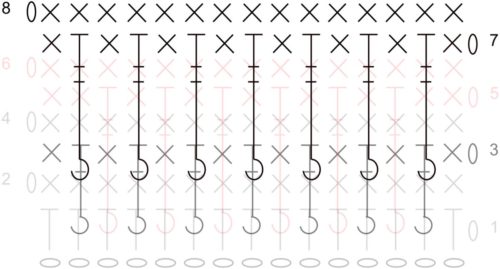
On to the crochet brioche stitch!
The stitch pattern is worked over an odd number of stitches, with a selvedge stitch worked as a sc at the beginning and end of each row.
Using col A, ch an even number of stitches (including 1 turning ch).

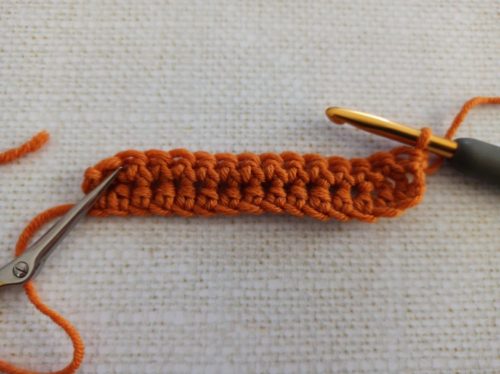
Row 1: 1 hdc in second ch from hook, 1 hdc in each st to end of row.
Row 2: Ch 1, 1 sc in each st to end of row.
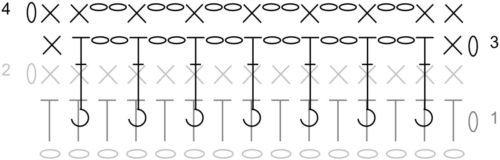
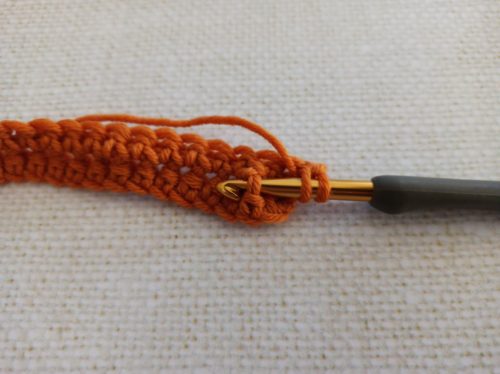
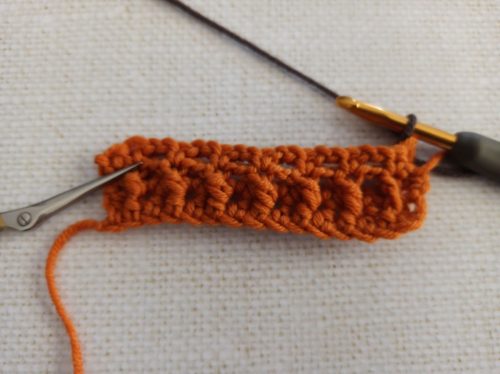
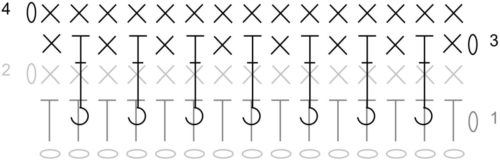
Row 3: (Post sts in this row are worked around stitches two rows below = in row 1.) Ch 1, 1 sc in first st, 1 FPdc around second hdc in row 1, * ch 2, skip 1 hdc in row 1, 1 FPdc around next hdc; repeat from * until 1 st remains at the end of row, 1 sc in last st.
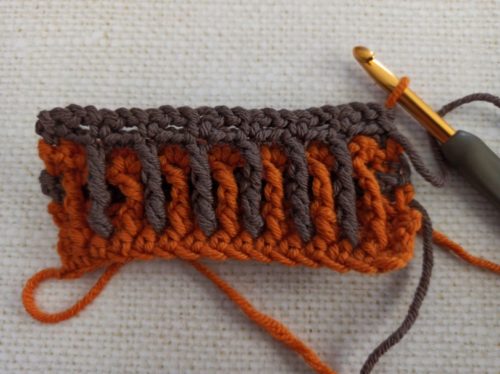
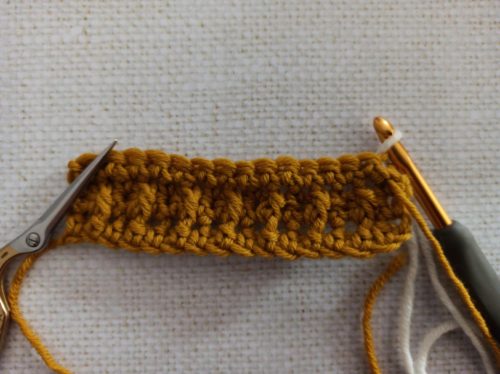
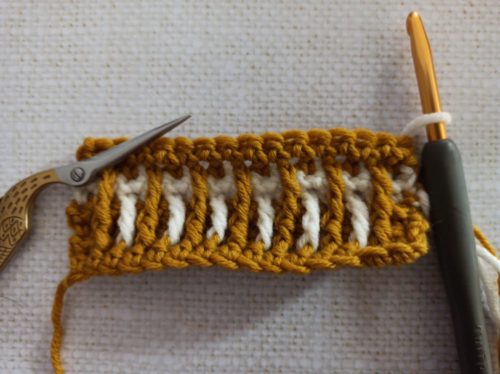
Here is how you insert your hook to make the first front post stitch:
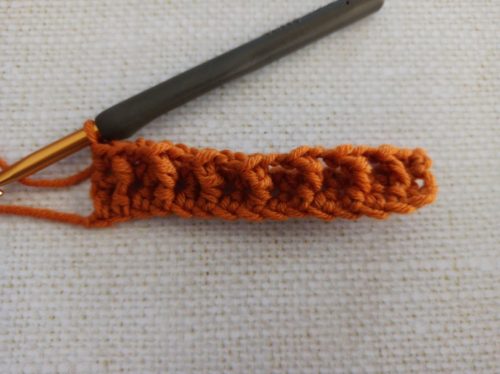
Row 4: Ch 1, 1 sc in each of first two stitches, * ch 2, skip ch space, 1 sc in next st; repeat from * until 1 st remains at the end of row, 1 sc in last st, changing colours in last st.
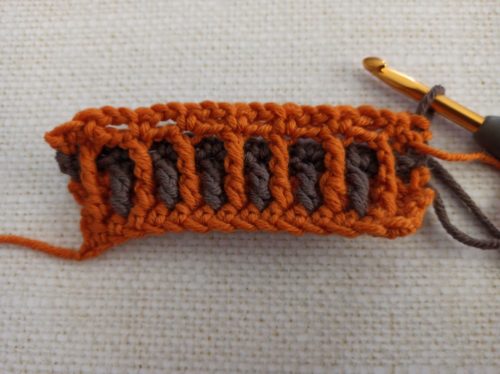
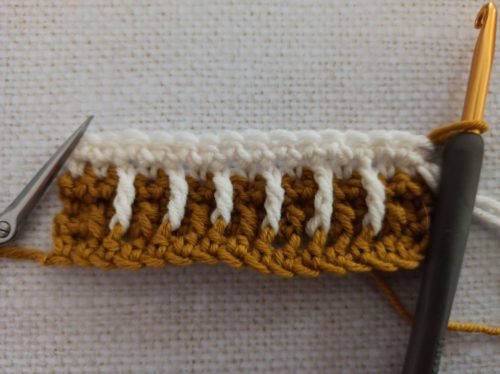
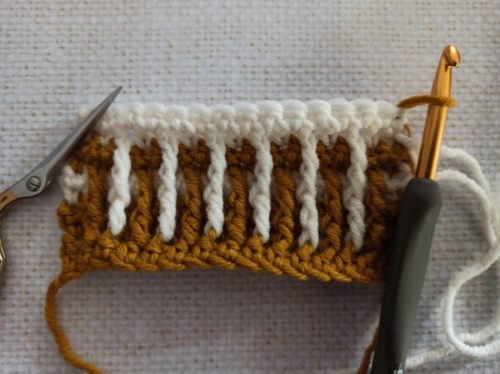
The result after row 4:
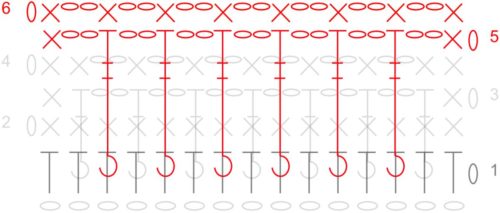

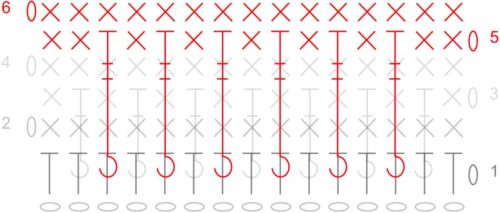
Row 5: (With col B – post sts in this row are worked around sts left available four rows below = in row 1.) Ch 1, 1 sc in first st, ch 2, 1 FPtr around third hdc in row 1, * ch 2, skip 1 hdc in row 1, 1 FPtr around next hdc; repeat from * until 2 sts remain at the end of row, ch 2, 1 sc in last st.
Row 6: Ch 1, 1 sc in first st, * ch 2, skip ch space, 1 sc in next st; repeat from * to end of row, changing colours in last st.
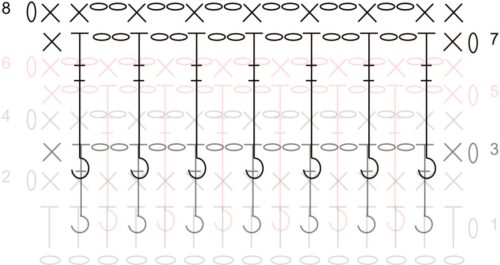
Row 7 : (With col A – post sts in this row are made around post sts in the same colour four rows below.) Ch 1, 1 sc in first st, 1 FPtr around first post stitch in same colour four rows below, * ch 2, 1 FPtr around next post st in same colour four rows below; repeat from * until 1 st remains at the end of row, 1 sc in last st.
Row 8: Ch 1, 1 sc in each of first 2 sts, * ch 2, skip ch space, 1 sc in next st; repeat from * until 1 st remains at end of row, 1 sc in last st, changing colours in last st.
Row 9: (With col B – post sts in this row are made around post sts in the same col four rows below.) Ch 1, 1 sc in first st, ch 2, 1 FPtr around first post stitch in same colour four rows below, * ch 2, 1 FPtr around next post st in same colour four rows below; repeat from * until 2 sts remain at end of row, ch 2, 1 sc in last st.
Row 10: Ch 1, 1 sc in first st, * ch 2, skip ch space, 1 sc in next st; repeat from * to end of row, changing colours in last st.
Repeat rows 7 – 10.
As explained above, you can also work the same stitch pattern replacing the ch spaces with sc’s worked in the sts in the previous row. The result is an overlay fabric, with post stitches running over a base fabric in sc.
To work your sc’s in the right stitch, make sure that you count the post stitch as a stitch in the current row, which means that you will skip the stitch in the previous row situated behind the post stitch.
Here’s how to do it:

The first two rows are worked exactly as previously:
Row 1: 1 hdc in second ch from hook, 1 hdc in each st to end of row.
Row 2: Ch 1, 1 sc in each st to end of row.
Row 3: (Post sts in this row are worked around stitches two rows below = in row 1.) Ch 1, 1 sc in first st, 1 FPdc around second hdc in row 1, * 1 sc in next st, skip 1 hdc in row 1, 1 FPdc around next hdc; repeat from * until 1 st remains at the end of row, 1 sc in last st.
Row 4: Ch 1, 1 sc in each st to end of row, changing colours in last st.
Row 5: (With col B – post sts in this row are worked around sts left available four rows below = in row 1.) Ch 1, 1 sc in first 2 sts, 1 FPtr around third hdc in row 1, * 1 sc in next st, skip 1 hdc in row 1, 1 FPtr around next hdc; repeat from * until 2 sts remain at the end of row, 1 sc in each of last 2 sts.
Row 6: As row 4.
Row 7: (With col A – post sts in this row are made around post sts in the same col four rows below.) Ch 1, 1 sc in first st, 1 FPtr around first post stitch in same colour four rows below, * 1 sc in next st, 1 FPtr around next post st in same colour four rows below; repeat from * until 1 st remains at the end of row, 1 sc in last st.
Row 8: As row 4.

Row 9: (With col B – post sts in this row are made around post sts in the same col four rows below.) Ch 1, 1 sc in each of first 2 sts, 1 FPtr around first post stitch in same colour four rows below, * 1 sc in next st, 1 FPtr around next post st in same colour four rows below; repeat from * until 2 sts remain at the end of row, 1 sc in each of last 2 sts.
Row 10: As row 4.
Repeat rows 7 – 10.
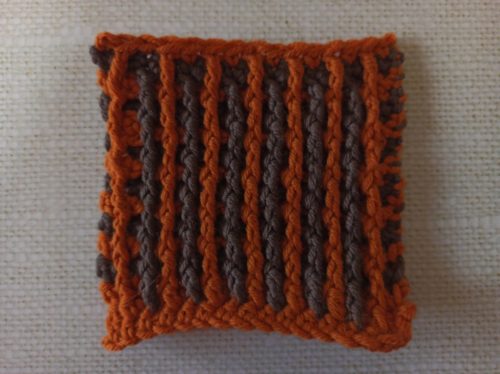
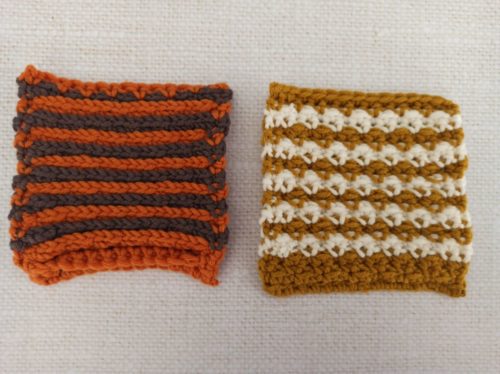
The two swatches look very much the same seen from the right side:
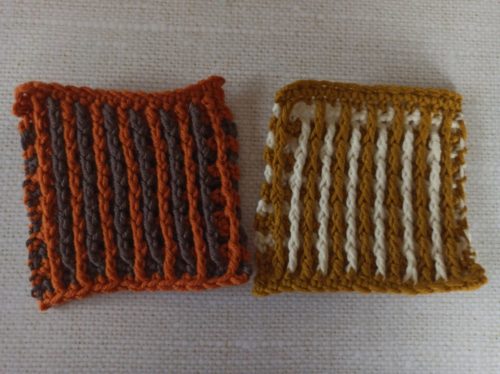
Now, let’s turn them over and look at their backs!
To the left, in the swatch with the chain arches, the different layers of stitches are very clear. These layers are held together only by the selvedge stitches and the post stitches. The rest of the fabric can move, which it will do quite easily, especially diagonally. These “free” layers also make this swatch ultra squishy.
To the right, we have something that looks quite a lot like two-colour stripes in sc. The back of the work is a flat fabric without openings. The fabric is firmer and keeps its shape well. It’s a bit less squishy, but also not as thick – rather the advantage, especially in a fabric worked with a springy DK wool (here, my organic merino 110).
Both techniques are interesting and can produce very satisfying results, such as a cosy cowl using the ch space technique or a bag using the sc technique.
However, you will need to manage the thickness of the fabric. These two swatches in organic merino 110 worked with a 5.5 mm hook are very thick – a thickness that I think limits the possibilities for using them.
I have also tested crochet brioche in my fingering weight merino. The fabric is not as thick, of course, but it’s still quite hefty in relation to the yarn itself, especially when using the ch space technique.
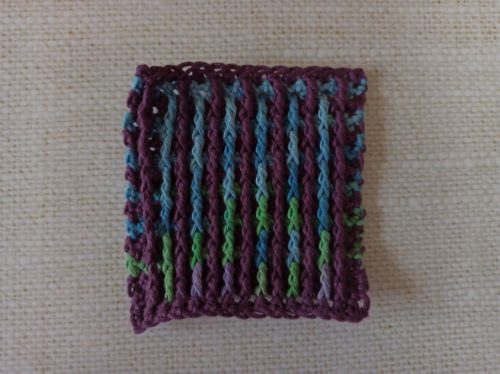
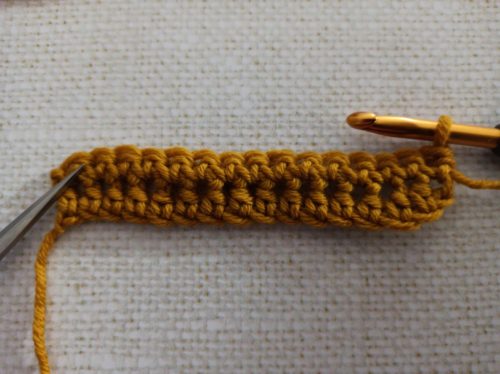
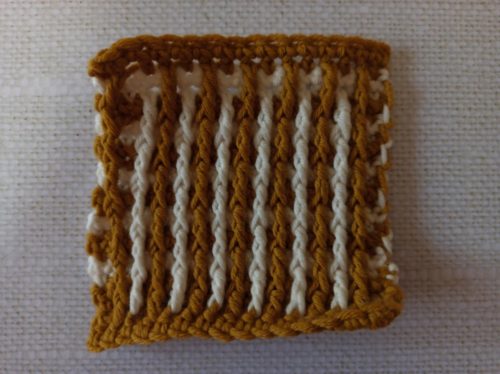
Yarn weight is, of course, important when it comes to managing the thickness of the resulting fabric, but fiber content also plays a role. The swatch pictured above is worked in the sc technique using my organic cotton. The result is quite interesting. There is still a layer of post stitches on top of a sc background, but the cotton is much denser and “flatter” than the wool. This gives a soft fabric that is not too thick. I can imagine many uses for crochet brioche using cotton.
But crochet brioche can also be used in other ways besides making straight vertical lines – next time we will have a look at how we can vary this pattern.
See you soon!

Thank you for such an excellent analysis and tutorial, and for taking the trouble to illustrate it so well! I was so impressed that I dare to ask the question I’ve puzzled over since I first saw crochet brioche patterns – why not just knit? Anyone with the dexterity and brain power to crochet a textured stitch can surely knit! (Or, to put it another way, if a certified klutz like me can do both, anyone can! 😂)
Hello Nancy,
This is the question I always ask myself when I see crochet patterns that imitate knitting!
However, not everyone knits, or desires to know how to knit.
Also, knitted brioche stitch and crochet brioche are very different in character. I imagine that this stitch was inspired by knitted brioche, but the construction and the finished fabric are very different from knitted brioche.
There is a place for both, in my view!
Thank you for commenting, I really enjoy discussing with readers!
I know this is a year later. As someone who use to knit, I ended up with nerve issues one day when I was hand quilting, and then found myself no longer being able to do the things I loved. Twenty plus years later I still have issues. You learn a lot exploring things in the hopes of finding a new creative outlet that doesn’t hurt the hands, or shoot nerve pain up through the elbows, and turn your hands numb. Knitting uses more of the fine motor muscles in the fingers and wrists, and in a different way than crocheting does. The last time I tried to knit I couldn’t use my hand for three months, waiting for nerves and numbness to subside. Crocheting uses the muscles in a different way, and it can still bother my hands depending on the pattern, and the yarn and crochet hook. I am very grateful for the Furls crochet hooks, and crochet pattern designers who make beautiful patterns. And wonderful blog posts like this one.
Thank you so much for sharing!
Nerve and muscle issues are a real problem for us using our hands to do the things we love.
You might be interested in this article: https://englishblog.annettepetavy.com/2023/02/24/4-tips-for-crocheting-without-pain/
Thank you for your kind words, I’m happy if you enjoy my work.