
Pretty, straight lines are nice, but there are other motifs to be made in crochet brioche!
In the previous tutorial, I showed you the basics of crochet brioche. That tutorial included two techniques (one using chains, the other on a background of sc). In this tutorial I’m going to use the second technique. For the instructions for the basic stitch pattern, please refer to the second part of my previous tutorial.
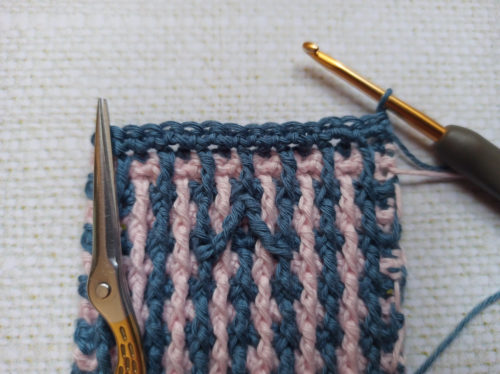
When preparing this tutorial I chose to work on a background of sc because I thought this minimized the major drawback of crochet brioche, in my opinion ; namely, the thickness of the resulting fabric. To follow through on this idea, I opted for a cotton yarn, less voluminous than wool. I had already made a swatch with my organic cotton (180m/50 g) that I had found promising.
This time I used Scheepjes Whirlette (455m/100g) and a 3 mm (US D) hook – a revelation! All my doubts about crochet brioche were swept away. With a lightweight yarn and the right hook, you get very interesting results with this technique. My inspiration returned, and I started to explore how to vary the basic stitch pattern.
In this tutorial I introduce two basic motifs to start “drawing” in crochet brioche. I will then proceed to see how I can combine them – and perhaps you will already have started having fun with these motifs, too!
To free your stitches from the straight vertical lines, they will need to straddle the columns in the basic stitch pattern. This means you will need to work taller stitches. To straddle my columns made from FPtr’s, I will use front post double trebles, FPdtr.
To work a double treble (dtr), yo 3 times, insert your hook in the indicated space, pull up a loop (there are 5 loops on the hook), repeat (yo, pull through 2 loops) four times. (Here we are going to work front post stitches, where the hook goes behind the post of another stitch.)
When you start working motifs, you can easily get a bit lost among the stitches. Feel free to count your stitches after each row to make sure you have the same number as before.
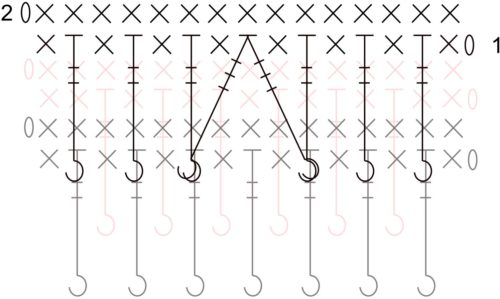
Opening
This motif, just like the following one, is centered over a specific column of stitches. You first need to decide which column will be at the center of your motif. Here, I’m going to draw a blue motif on a pink background, centering my motif on column A. Three columns (all blue) will be involved in the making of the motif: A, A-1 and A+1.
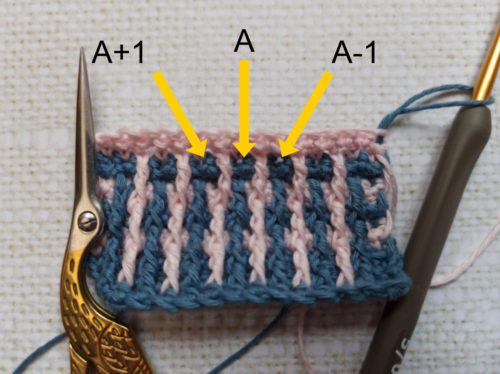
The instructions given pertain only to these three columns – the rest of the swatch is in basic crochet brioche, as explained previously.
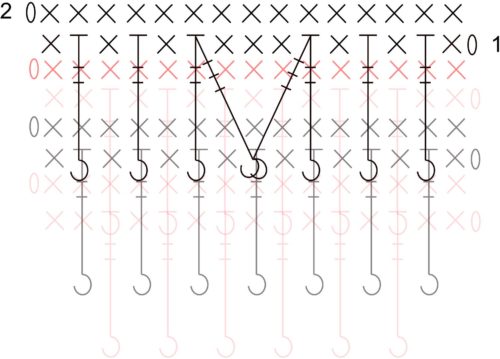
Row 1: Work in basic crochet brioche to column A-1. In column A-1 make (1 FPtr + 1 FPdtr together, inserting your hook for the FPtr in column A-1 and for the FPdtr in column A), 1 sc in each of next 3 sts, in column A+1 make (1 FPdtr + 1 FPtr together, inserting your hook for the FPdtr in column A and for the FPtr in column A+1), finish row in basic crochet brioche.
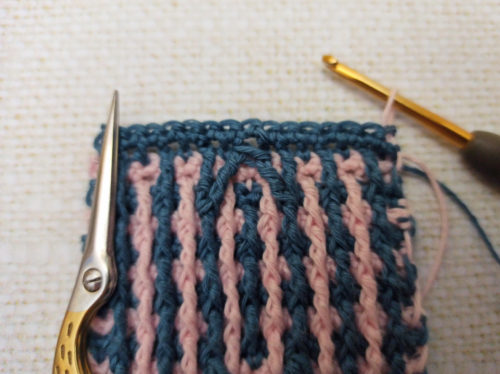
Row 2: Ch 1, 1 sc in each st to end of row, changing colour in the last st.
Row 3: Work in basic crochet brioche until a sc has been made in column A-1, 1 FPtr around next post st in same colour four rows below passing under the FPdtr two rows below, 1 sc in next st, 1 FPtr around next post st in same colour four rows below passing under the FPdtr two rows below, finish row in basic crochet brioche.
Row 4: As row 2.

To reestablish the stitch pattern on the following row, I suggest doing as follows:

Row 5: Work in basic crochet brioche to column A-1, in column A-1 make 1 FPtr around the sts worked together four rows below, 1 sc in next st, in column A work 1 FPtr around sc in same colour four rows below, 1 sc in next st, 1 FPtr around the sts worked together four rows below, finish row in basic crochet brioche.
Row 6: As row 2.

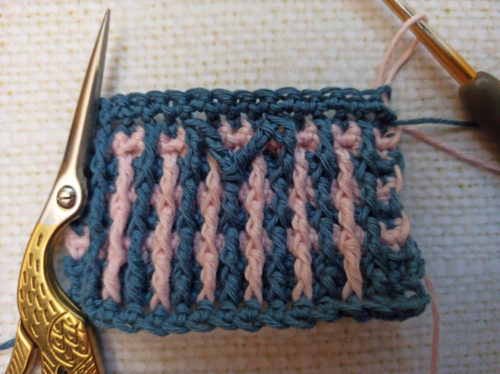
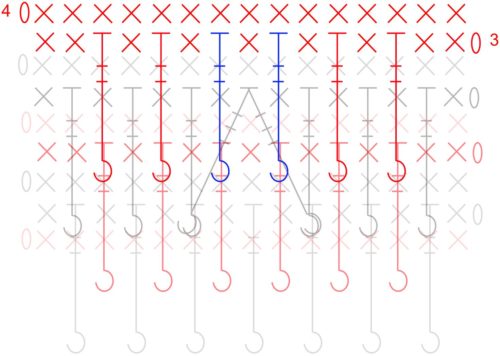
Closing
As for the previous motif, decide which column will be column A, at the center of the motif.
Row 1: Work in basic crochet brioche to column A. In column A make FPdtr2tog, inserting the hook first in column A-1 and second in column A+1, finish row in basic crochet brioche.
Row 2: Ch 1, 1 sc in each st to end of row, changing colour in the last st.
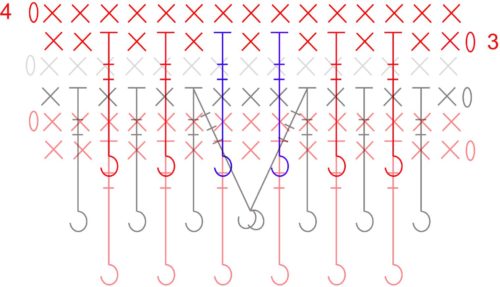
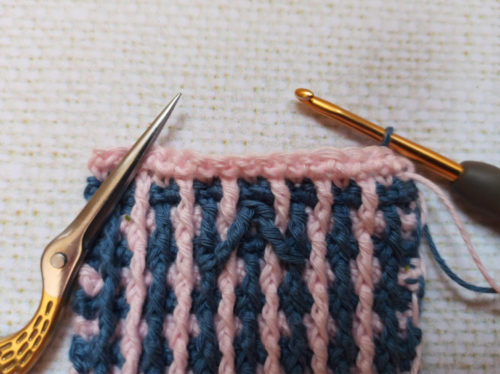
two rows below.
Row 3: Work in basic crochet brioche until a sc has been made in column A-1, 1 FPtr around next post st in same colour four rows below passing under the first FPdtr2tog two rows below, 1 sc in next st, 1 FPtr around next post st in same colour four rows below passing under the second FPdtr2tog two rows below, finish row in basic crochet brioche.
Row 4: As row 2.
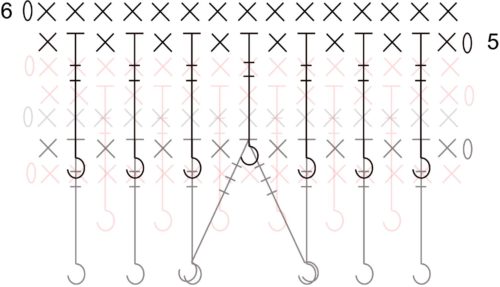
Row 5: Work in basic crochet brioche to column A, in column A make 1 FPtr around the FPdtr2togfour rows below, finish row in basic crochet brioche.
Row 6: As row 2.
The stitch pattern is reestablished ; you can continue in basic crochet brioche.
For the next tutorial, I will work on how to combine these two motifs in different ways!
Please feel free to share your thoughts on crochet brioche in the comments below!
See you soon!